 The Library Tech Commons offers a collection of audio/visual hardware for a variety of video production needs. Equipment can be checked out by UCSF faculty, staff and students.
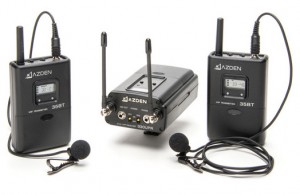
The Azden 330 Dual-Channel Wireless Microphone kit offers two wireless lavaliere microphones that transmit to a single receiver. This allows you to capture the audio from two subjects at once with a single camera or recording device.
Use cases for this device include:
- Capture audio from both the interviewer and interviewee in an on-camera video interview.
- Record a conversation between two people from a distance.
- Record the audio from multiple presenters and allow them to walk around the room freely.
Pairs with: Canon Vixia camera kit, Zoom H2n.
Batteries required: Six AA batteries (not included) if using both mics, four batteries if using just one mic.
To operate the Azden devices, follow these basics steps.
Receiver set up:
- Install AA batteries into each of the two transmitters and the receiver. You will need a total of six AA batteries to power both mics and the receiver. Tech Commons staff do not provide AA batteries.
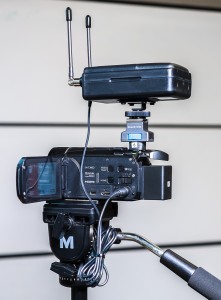
- If you are connecting to a Canon Vixia camera, install the Pearstone adapter (included in camera kit) onto the camera’s shoe adapter, and then connect the receiver’s mount to the Pearstone adapter. Secure both snugly by rotating their dials to the right, but do not over-tighten.
- Connect one end of the 3.5mm audio cable to the MIC OUT port on the Azden receiver and the other end to the MIC port on the Vixia camera.
- Flip the channel one and two switches to the ON position. If you are only using one mic, only flip on that mic’s corresponding switch.
Transmitters set up:
- Connect the lavaliere microphone cable to the MIC port on the transmitter.
- Clip the transmitter pack to your subject’s belt, or place it in a jacket pocket.
- Clip the mic to your subject’s shirt. If possible, thread the cable under their shirt for a more clean and professional look.
- Turn both the AUDIO and POWER switches ON.
These additional notes will help you use the microphones smarter and avoid common pitfalls.
- No audio – Make sure the AUDIO switch on the transmitter is set to ON and not ST.BY. This is the stand by mode, and equivalent to a mute button!
- Interference – Still no audio, or getting interference? Download the handout provided below, and review the Additional functions section for information about adjusting audio levels and frequency channels.
- Mic placement – Position the microphones between 4″ and 10″ from your subject’s mouth, centered on their body relative to the direction they are facing, and remove any outer layers or necklaces that could bump the mic during recording.
- Concealing cables – Watch a video on how the pros loop and conceal mics.
- Range – The wireless range of the mics is over 100 feet, but obstacles (trees, cars or walls) can reduce that range significantly, or even block the signal completely.
- Antennae positioning – For the best reception, move the receiver’s antennas to an upward/vertical position.
Note about stereo vs mono: This kit is designed to accept two audio sources simultaneously. Unfortunately, this means you will only hear audio from channel 1 on the left, and audio from channel 2 on the right (two mono audio signals). The Canon Vixia and the Azden receiver do not have options to force these signals to both channels, so that must be done in post-production using video editing software. Using Final Cut Pro, you can set the audio tracks to “dual mono.” iMovie does not have this functionality. Using the link below this article, contact us if you would like assistance with this process.
The approximate value of this kit is $750. If anything is lost or damaged during your loan, you are responsible for replacing those items.
Reservations can be made using our online reservation calendar.
The maximum loan time for this device is 4 days. Staff are available Monday, Tuesday, and Thursday from 9am to noon, in CL240 of the Parnassus Library for equipment check-out. Equipment can only be used for UCSF related activities, by UCSF students, staff and faculty. More information about the reservation process and our policies can be found here: How to Reserve Equipment.